SCENARIO
While working on one of the requirements for a manufacturing
solutions customer based out Atlanta, Georgia there was need to automate User Onboarding Process
based on the profile they are assigned to. When a user is added through the data loader, need to add that user to a
public group (10 possible groups) automatically. Client wants the new user to be assigned to certain public groups based on the profile the new user has.
APPROCAH
We can think of many solutions to achieve the requirement, for example - Trigger, Apex Class
etc., but we've decided to go with less coding approach either through Salesforce flow or Process builder to achieve the
requirement.
We'd faced bulkification issue in Process builder earlier, we choose
to go with salesforce flow to meet this requirement.
CHALLENGE
Based on the approach taken, we lead to a
situation for having multiple groups assignment for user and comma separated public group Ids.
We have used custom metadata for required
configuration.
We were able to get list
of IDs (Collection of Ids) which are stored in a text field of custom metadata. We can use the same in our
Salesforce Flow further execution.
Example:-
Input String :- 00G2x000000X1GPEA0, 00G2x000000X1GUEA0, 00G2x000000X1GZEA0
Output String Collection:- 00G2x000000X1GPEA0
00G2x000000X1GUEA0
00G2x000000X1GZEA0
In the above example, comma-separated input string is 00G2x000000X1GPEA0,
00G2x000000X1GUEA0, 00G2x000000X1GZEA0 and
output is an Array List - string collection.
Below are the steps to get a List of Ids from a comma-separated string of
Ids.
Step 1:- Define flow properties.
- Click Setup.
- In the Quick Find box, type Flows.
- Select Flows then click on the New Flow.
- Select the Autolaunched Flow (No Trigger) option and click on Next and configure the flow as follows:
- How do you want to start building: Freeform
Step 2:- Flow variables and formulas.
In this step, we will define variables and formulas.
Define InputString Text variable to store entered string.
- Under Toolbox, select Manager, click on New Resource.
- Input following information,
- Resource Type - Variable
- API Name - InputString
- Data Type - Text
- Allow multiple values (collection) - Uncheck
- Click Done.

InputString variable
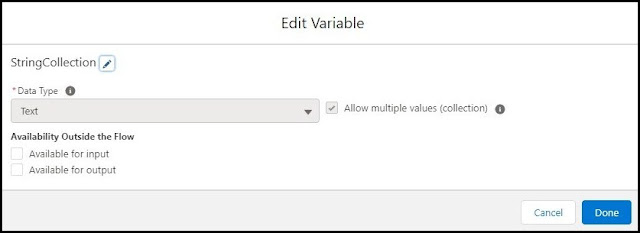
Define StringCollection Text variable to store separated string.
- Under Toolbox, select Manager, click on New Resource.
- Input following information,
- Resource Type - Variable
- API Name - StringCollection
- Data Type - Text
- Allow multiple values (collection) - check
- Click Done.
 |
| StringCollection variable Define GetFirstElementFromString Formula to Get the first element
from InputString.
TRIM(LEFT({!InputString}, FIND(",",{!InputString} )-1))
|

GetFirstElementFromString Formula
Define RemoveElementFromString formula to remove element from InputString.
- Under Toolbox, select Manager, click on New Resource.
- Input following information,
- Resource Type - Formula
- API Name - RemoveElementFromString
- Data Type - Text
- Formula -
TRIM(RIGHT({!InputString}, LEN({!InputString}) - FIND(",", {!InputString})))
- Click Done.
 |
| RemoveElementFromString Formula |
Step 3:- Create Screen Element
In this step, we will create screen element to get the
InputString.
- Under Toolbox, select Elements. Drag and drop Screen onto the canvas.
- Fill following Information on Screen Properties.
- Enter Label the API Name will auto-populate.
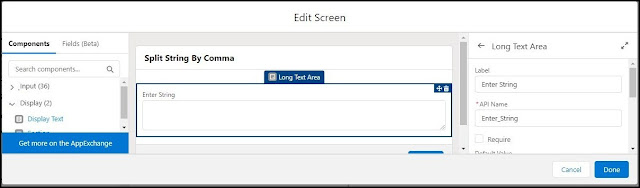
- Under Components, select Input, Drag and drop Long Text Area onto the screen. fill the following details on Long Text Area.
- Label - Enter String
- API Name - Enter_String
- Click Done.
- Connect Start to Screen Element.
 |
| Screen Element |
In this step, we will assign Entered string to InputString.
- Under Toolbox, select Elements. Drag and drop Assignment onto the canvas.
- Fill as below,
- Enter Label and API Name will auto-populate.
- Set variable values as follow.
- Variable - InputString
- Operator - Equals
- Value - Enter_String
- Click Done.
- Connect screen element to assignment element.
 |
Assign Enter string to Input String |
Step 5:- Create Decision Element
In this step, we will check InputString is null or
InputString has one string or InputString has multiple strings separated by a comma.
- Under Toolbox, select Elements. Drag and drop Decision onto the canvas.
- OutComes
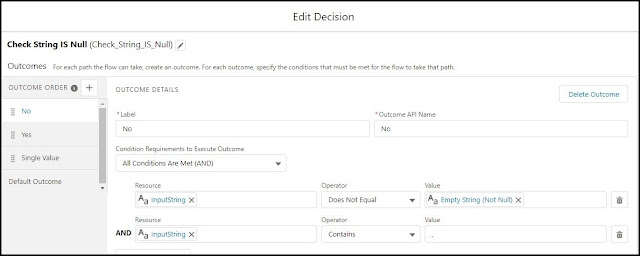
- No (If InputString contains multiple strings)
- Enter Label as No Outcome API Name will auto-populate.
- Condition Requirements to Execute Outcome - All Conditions Are Met (AND)
- Row 1
- Resource - InputString
- Operator - Does Not Equal
- Value - Empty String (Not Null)
- Row 2
- Resource - InputString
- Operator - Contains
- Value - ,
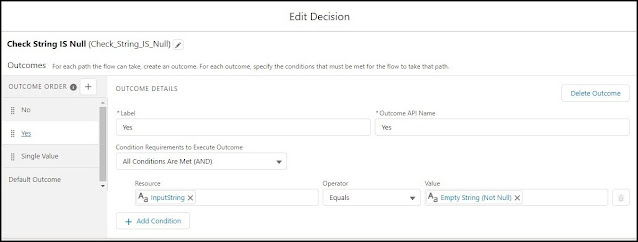
- Yes (If inputString is null/empty)
- Enter Label as Yes Outcome API Name will auto-populate.
- Condition Requirements to Execute Outcome - All Conditions Are Met (AND)
- Row 1
- Resource - InputString
- Operator - Equals
- Value - Empty String (Not Null)
- Single Value (If InputString has a single string)
- Enter Label as Single Value Outcome API Name will auto-populate.
- Condition Requirements to Execute Outcome - Custom Condition Logic Is Met
- Condition Logic - 1 AND NOT 2
- Row 1
- Resource - InputString
- Operator - Does Not Equal
- Value - Empty String (Not Null)
- Row 2
- Resource - InputString
- Operator - Contains
- Value - ,
- Click Done.
- Connect assignment element to decision element.
 |
| Decision element No as outcome |
 |
| Decision element Yes as outcome |
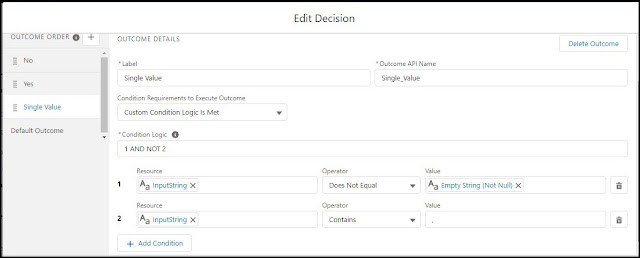 |
| Decision element Single Value as outcome |
Step 6:- Create Assignment Element
In this step, we will add InputString in StrinCollection and assign InputString as empty for Single Value
outcome of the decision.
- Under Toolbox, select Elements. Drag and drop Assignment onto the canvas.
- Enter Label and API Name will auto-populate.
-
Set Variable Values as below.
- Row 1
- Variable - StringCollection
- Operator - Add
- Value - InputString
- Row 2
- Variable - InputString
- Operator - Equals
- Value - Empty String (Not Null)
- Click Done.
- Connect decision element to assignment element for Single Value outcome.
- Connect back assignment element to decision element.
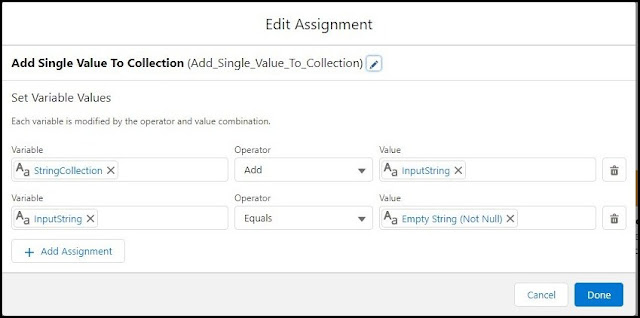 |
| Assignment Add Single Value To
Collection |
In this step, we will add the
first element from InputString to StringCollection and remove that element to InputString for No outcome of
decision.
- Under Toolbox, select Elements. Drag and drop Assignment onto the canvas.
- Enter Label and API Name will auto-populate.
-
Set Variable Values as below.
- Row 1
- Variable - StringCollection
- Operator - Add
- Value - GetFirstElementFromString
- Row 2
- Variable - InputString
- Operator - Equals
- Value - RemoveElementFromString
- Click Done.
- Connect decision element to assignment element for No outcome.
- Connect back assignment element to decision element.
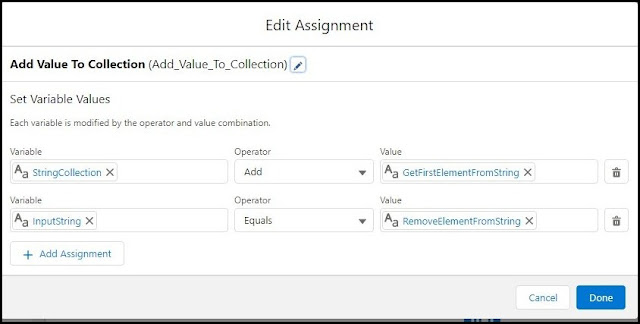 |
| Assignment Add value to Collection |
Step 8:- Create Screen Element
In this step, we will create a screen to see output.
- Under Toolbox, select Elements. Drag and drop Screen onto the canvas.
- Fill following Information on Screen Properties.
- Enter Label the API Name will auto-populate.
- under Components, select Input, Drag and drop Long Text Area onto the screen. fill the following details on Long Text Area.
- Label - String Collection
- API Name - String_Collection
- Default Value - {!StringCollection}
- Click Done.
- Connect decision element to screen element for Yes outcome.
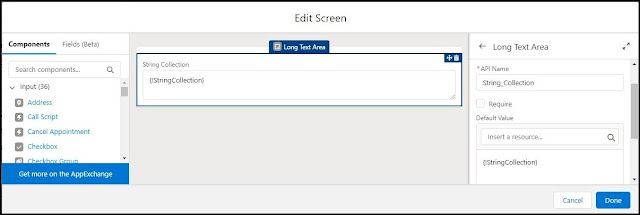 |
| Screen Element output StringCollection |
Flow:-
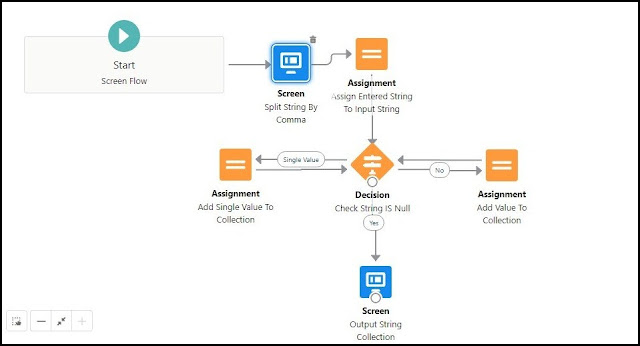 |
| Flow diagram |

If you have any questions you can reach out our Salesforce Consulting team
here.


