
SCENARIO
While working on one of the requirements for an Electric Automotive Company based in Sweden, there was a requirement to send an Email to the Case creator when something is posted or commented on chatter.
APPROACH
As the requirement is pretty straightforward, The client wants to send an email to the case creator. We have many ways to achieve this requirement like Apex Code, but Salesforce encourages us to code less.
So, we have used Record Trigger Flow to fulfill this requirement.
Below are the steps to achieve the requirement:
Step 1:- Define flow properties.
- Click Setup.
- In the Quick Find box, type Flows.
- Select Flows then click on the New Flow.
- Select the Record-Triggered Flow option and click on Next and configure the flow as follows:
- How do you want to start building: Freeform
Step 2:- Select Object and Set Entry Condition.
Give Input as follows:
- Object: Feed Item.
- Trigger the Flow When: A record is created or updated.
- Condition Requirements: All Conditions Are Met(AND).
- Field: ParentId.
- Operator: Starts With.
- Value:500(Case Object record Id starts with "500...").
- When to Run the Flow for Updated Records: Every time a record is updated and meets the condition requirements.
- Optimize the Flow for Actions and Related Records.

Step 3:- Get Case Records.
Drag Get Record Element into canvas from Data Section under Elements Tab from the ToolBox & Give Input as follows:
- Object: Case.
- Condition Requirements: All Conditions Are Met(AND).
- Field: Id.
- Operator: Equals.
- Value:{!$Record.Parent:Case.Id}.
- How Many Records to Store: Only the first record.
- How to Store Record Data: Automatically store all fields.
- Join start Element to Get Element.

Step 4:- Create a Decision.
Drag Decision Element into canvas from Logic Section under Elements Tab from the ToolBox & Give Input as follows:
- Condition Requirements to Execute Outcome: All Conditions Are Met(AND).
- Resource: {!Get_Case_Records.CreatedBy.Id}.
- Operator: Is Null.
- Value: False.
- When to Execute Outcome: If the condition requirements are met.
- Join Get Element to Decision Element.

Step 5:- Define Body and Subject Variables for Email.
We need to create flow variables for the Body & Subject portion of the email.
Click New Resource under Elements Tab from the ToolBox & Give Input as follows:
- Resource Type: Text Template.
- API Name: TextTemplate.(Write as per your convenience)
- Body: Comment has been Made. (Write as per your convenience)
- Click Done.
Repeat the same above steps for Subject.
- Resource Type: Text Template.
- API Name: SubjectTemplate.(Write as per your convenience)
- Body: Hi How are you?. (Write as per your convenience)
- Click Done.
Step 6:- Send an Email.
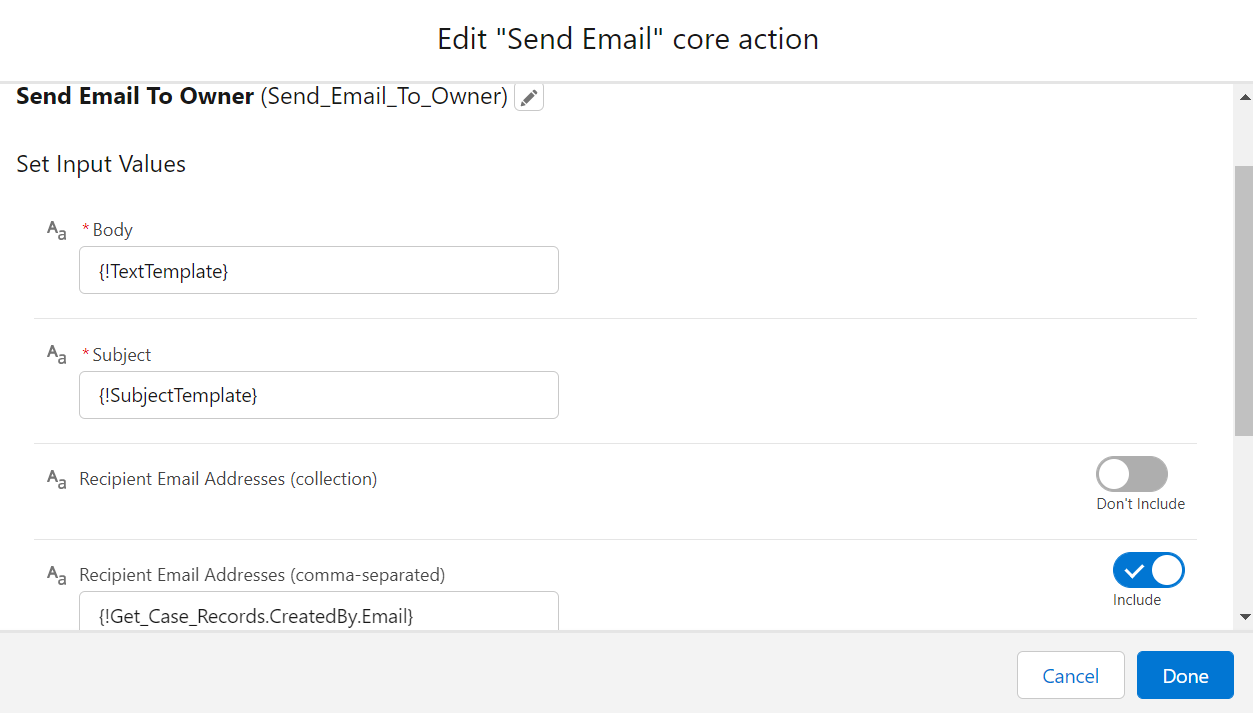
Drag Action Element into canvas from Interaction Section under Elements Tab from the ToolBox, scroll down the list from the left-hand side and select Email from the bottom, in the Action select Send Email & Give Input as follows:
- Set Body & Subject variables in their respective input field.
- Press the Don't Include Button for RecipientEmailAddresses(comma-separated) and set it to Include(True).
- RecipientEmailAddresses(comma-separated):{!Get_Case_Records.CreatedBy.Email}.
- Click Done.
- Join Decision Element to Email Action Element for Case Creator.
Step 7:- Now Save the flow & then Activate it.
FLOW DIAGRAM

CONCLUSION
By following the steps mentioned above you can send an Email Notification to Case Creator when something is Posted/Commented on the Chatter.
If you have any questions you can reach out our Salesforce Consulting team
here.


