Showing posts with label Screen Flow. Show all posts

Thursday, 2 June 2022

Using the Button, send the Record Id to the Flow

Scenario :
While working on one of the requirements for a health sector project for a client based out of MelbourneAustralia there was a requirement to avail current record id in a flow by clicking a button for further actions.

Approach : 
The client wants a custom button on the Contact record page to launch the flow and avail the record id in a flow.

By passing the record id in a flow URL we can get the record id in a flow. Let's see with the example. 

Follow the below steps to create a flow.

Screen Flow :

Step 1:-  Define flow properties.
  • Click Setup.
  • In the Quick Find box, type Flows.
  • Select Flows then click on the New Flow.
  • Select the Screen Flow option and click on Next and configure the flow as follows:
    • How do you want to start building: Freeform
Step 2:- Flow variable
Define recordId Text variable to store Record Id.
  • Under Toolbox, select Manager and click on New Resource.
  • Input the following information,
    • Resource Type - Variable
    • API Name - recordId
    • Data Type - Text
    • Allow multiple values (collection) - Uncheck 
    • Available for InputCheck
  • Click Done.
recordId variable

Step 3:- Create Screen Element
We will create a screen element to display Record Id in this step.
  • Under Toolbox, select Elements. Drag and drop Screen onto the canvas.
  • Fill following Information on Screen Properties.
    • Enter Label the API Name will auto-populate.
    • under Components, select Display Text, Drag, and drop Display Text onto the screenfill the following details.
      • API Name - Show_recordId
      • Insert a resource - {!recordId}
  • Click Done.
  • Connect start element to screen element.
Screen element

Our Flow is complete, Save and Activate the Flow. below is a diagram of the Flow.

Flow Diagram

Flow diagram

Now, Our Flow looks good. Let's create a custom button on the contact object and add a button on the contact page layout.

Custom Button

Follow the below steps to create a button on the contact object.

Step 1: 
  • Go to Setup > Object Manager
  • Select a Contact Object
Step 2:
  • Go to Buttons, Links and Actions
  • Click on New Button or Link 
Step 3:
Fill in the below details.
  • Label - Run Flow
  • Name - Run_Flow
  • Display Type - Detail Page Button
  • Behavior - Display in new window
  • Content Source - URL
  • Fill the below URL in the text area
/flow/Get_RecordId_In_Flow_Example?recordId={!Contact.Id}&retURL={!Contact.Id}

Click on the Save button.
Custom button

Add the custom button to the page layout

Below are the steps to add the custom button to the contact page layout.
  • Go to Page Layout. Select the edit option.
  • Select Mobile and Lightning Experience Actions from the panel.
  • Drag and drop Run Flow custom button to the Mobile and Lightning Experience Actions section.
  • Click Save.

Contact page layout
Output


Click here to see the Trailhead badge on Distribute the Flow with a Custom Button for more information.

If you have any questions you can reach out our Salesforce Consulting team here.

Thursday, 14 April 2022

Lightning Web Component in Flows

Lightning Flow Builder is one of the powerful automation tools available in Salesforce which gets the work done without a single line of code.

In Lightning Flow Builder, you can accomplish almost anything like creating records, updating records, sending emails, triggering approval processes, connecting to an external system, and from winter 20 release, Lightning Web Components can be incorporated into Flow.

Lightning Web Components in Flow: Why to use them
Lighting Web Components in Flow provides a better User experience and also accomplishes many tasks that flow cannot be accomplished alone.

Adding Lightning Web Components to Flows
To add Lightning Web Components available for Flow screens, add a target to the targets tag in the component’s Meta XML file.

 1
 2
 3
 4
 5
 6
 7
 8
 9
10
11
12
13
<?xml version="1.0" encoding="UTF-8"?>
<LightningComponentBundle xmlns="http://soap.sforce.com/2006/04/metadata">
    <apiVersion>52.0</apiVersion>
    <isExposed>true</isExposed>

    <targets>
        <target>lightning__FlowScreen</target>
        <target>lightning__AppPage</target>
        <target>lightning__RecordPage</target>
        <target>lightning__HomePage</target>
    </targets>
        
</LightningComponentBundle>

By adding the above tags, the Lightning Web Component becomes available for flow screens.

Let's have a look at the example, A flow that displays a list of account with Lightning Design, select the accounts, and display the selected account Ids.

Wait a while!. How would the Flow knows which accounts are selected in the Lightning component ?, Is there any mechanism to communicate between LWC and Flows? We must declare the properties that can communicate between LWC and Flow. Since we have Targets, we also have Target Configs. To look more at the Configuration tag in Salesforce Documentation.

Let's Jump into the Lightning Web Component Code.

Lightning Web Component

lwcFlow.html
 1
 2
 3
 4
 5
 6
 7
 8
 9
10
11
12
13
14
15
16
17
18
19
20
21
22
23
24
25
26
27
28
29
30
31
32
33
34
35
36
37
38
39
40
41
42
43
44
<template>
    <lightning-card title="Accounts List" icon-name="standard:account">
        <div class="slds-p-around_x-small">
            <table class="slds-table slds-table_cell-buffer slds-table_bordered">
                <thead>
                    <tr class="slds-line-height_reset">
                        <th class="" scope="col">
                            <div class="slds-truncate" title="Edit">Select</div>
                        </th>
                        <th class="" scope="col">
                            <div class="slds-truncate" title="Account Name">Account Name</div>
                        </th>
                        <th class="" scope="col">
                            <div class="slds-truncate" title="Industry">Industry</div>
                        </th>
                        <th class="" scope="col">
                            <div class="slds-truncate" title="Phone">Phone</div>
                        </th>                        
                    </tr>
                </thead>
                <tbody>
                    <template for:each={accs} for:item="acc"> 
                        <tr key={acc.Id} class="slds-hint-parent">
                            <td data-label="Prospecting">
                                <div class="slds-truncate" title="Select">
                                    <lightning-input type="checkbox-button" label="select" variant="label-hidden" onchange={handleCheck} name={acc.Id}></lightning-input>
                                </div>
                            </td>                                
                            <td data-label="Prospecting">
                                <div class="slds-truncate" title="Account Name">{acc.Name}</div>
                            </td>
                            <td data-label="Confidence">
                                <div class="slds-truncate" title="Industry">{acc.Industry}</div>
                            </td>
                            <td data-label="Confidence">
                                <div class="slds-truncate" title="Phone">{acc.Phone}</div>
                            </td>
                        </tr>
                    </template>
                </tbody>
            </table>
        </div>
    </lightning-card>
</template>

lwcFlow.js
 1
 2
 3
 4
 5
 6
 7
 8
 9
10
11
12
13
14
15
16
17
18
19
20
21
22
import { LightningElement,api } from 'lwc';

export default class LwcFlow extends LightningElement {
    @api selectedAccs = [];
    @api selectedAccsString;
    @api accs = [];

    handleCheck(event) {
        if(!this.selectedAccs.includes(event.currentTarget.name))
            this.selectedAccs.push(event.currentTarget.name);
        else {
            for(let i = 0; i < this.selectedAccs.length; i++) {
                if(event.currentTarget.name === this.selectedAccs[i])
                this.selectedAccs.splice(i, 1);
            }
        }
        
        // eslint-disable-next-line @lwc/lwc/no-api-reassignments
        this.selectedAccsString = JSON.stringify(this.selectedAccs);
        
    }
}
 
lwcFlow.js-meta.xml
 1
 2
 3
 4
 5
 6
 7
 8
 9
10
11
12
13
14
15
16
17
18
19
20
<?xml version="1.0" encoding="UTF-8"?>
<LightningComponentBundle xmlns="http://soap.sforce.com/2006/04/metadata">
    <apiVersion>52.0</apiVersion>
    <isExposed>true</isExposed>

    <targets>
        <target>lightning__FlowScreen</target>
        <target>lightning__AppPage</target>
        <target>lightning__RecordPage</target>
        <target>lightning__HomePage</target>
    </targets>

    <targetConfigs>
        <targetConfig targets="lightning__FlowScreen">
            <property name="accs" type="@salesforce/schema/Account[]" label="Accounts" description="list of Accounts"/>
            <property name="selectedAccs" type="String[]" label="Selected Accounts" description="Selected Account Ids"/>
            <property name="selectedAccsString" type="String" label="Selected Accounts String" description="Selected Account Ids"/>
        </targetConfig>
    </targetConfigs>    
</LightningComponentBundle>

Lightning Web Component looks good. Now, Let's build Screen Flow.

Flow
Step 1:-  Define flow properties.
  • Click Setup.
  • In the Quick Find box, type Flows.
  • Select Flows then click on the New Flow.
  • Select the Screen Flow option and click on Next and configure the flow as follows:
    • How do you want to start building: Freeform
Step 2:- Flow variables
In this step, we will define variables.

Define AccountList  collection to store Account records.
  • Under Toolbox, select Manager, click on New Resource.
  • Input following information,
    • Resource Type - Variable
    • API Name - AccountList
    • Data Type - Record
    • Object - Account
    • Allow multiple values (collection) - Check 
    • Availability Outside the Flow
      • Available for input - Check
      • Available for output - Check
  • Click Done.
AccountList Collection

Define SelectedIds Text variable to store Account Ids as string.
  • Under Toolbox, select Manager, click on New Resource.
  • Input following information,
    • Resource Type - Variable
    • API Name - SelectedIds
    • Data Type - Text
    • Allow multiple values (collection) - Uncheck 
    • Availability Outside the Flow
      • Available for input - UnCheck
      • Available for output - Check
  • Click Done.
SelectedIds Variable

Step 3:-  Create Get Records Element
In this step, we will create Get Records Element to get Account records.
  • Under Toolbox, select Elements. Drag and drop onto Get Records Element the canvas.
  • Fill following Information.
    • Enter Label the API Name will auto-populate.
    • Object - Account
    • Filter Account Records
      •  Condition Requirements -All Conditions Are Met (AND)
      • Industry Equals - Electronics
    • Sort Account Records - Ascending
    • Sort By - Name
    • How Many Records to Store - All records
    • How to Store Record Data - Choose fields and assign variables (advanced)
    • Select Variable to Store Account Records
      • Record Collection - AccountList
    • Select Account Fields to Store in Variable
      • ID
      • Name
      • Industry
      • Phone
  • Click Done.
  • Connect Start to Get Records Element.

Get Records Element

Step 4:-  Create Screen Element
In this step, we will create screen element for Lightning Web Component .
  • Under Toolbox, select Elements. Drag and drop Screen onto the canvas.
  • Fill following Information on Screen Properties.
    • Enter Label the API Name will auto-populate.
    • Under Components, select Custom, Drag and drop lwcFlow onto the screenfill the following details on lwcFlow.
      • Label - Display Accounts
      • API Name - Display_Accounts
      • Accounts- {!AccountList}
      • Selected Accounts String - {!SelectedIds}
      • Advanced 
      • Manually assign variables - Check
      • Store Output Values to Select Variables
        • Accounts - {!AccountList}
        • Selected Accounts String - {!SelectedIds}
      • Revisited Screen Values
        • Use values from when the user last visited this screen - Check
  • Click Done.
  • Connect Get Records Element to Screen Element.


Screen Element
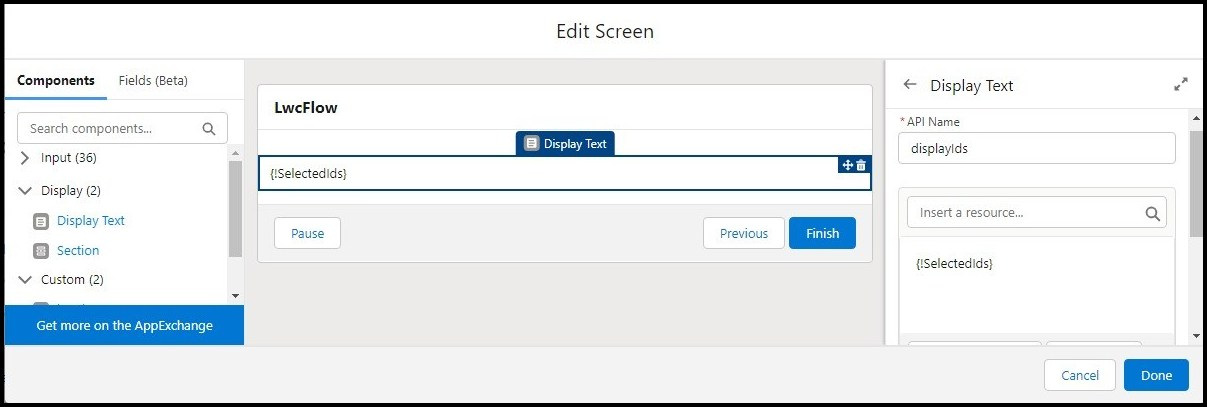
Step 5:-  Create Screen Element
In this step, we will create screen element to display selected Account Ids.
  • Under Toolbox, select Elements. Drag and drop Screen onto the canvas.
  • Fill following Information on Screen Properties.
    • Enter Label the API Name will auto-populate.
    • Under Components, select Display, Drag and drop Display Text onto the screenfill the following details on Long Text.
      • API Name - displayIds
      • Insert a resource ... - {!SelectedIds} 
  • Click Done.
  • Connect Screen Element to Screen Element.
Screen Element

Flow Diagram 

Output 
If you have any questions you can reach out our Salesforce Consulting team here.