Showing posts with label VFPage. Show all posts

Thursday, 21 April 2022

[Resolved:] Displaying and Redirecting Vf Page from Aura Component by disabling clickjack protection using iframe through quick action


SCENARIO 

While working on one of the requirements for an insurance sector solutions customer based in Chicago, Illinois there was a requirement to display and redirect Vf page from the lightning aura component through quick action by compulsorily using IFrame.

CHALLENGE

We achieved this functionality of redirecting VF page from aura component.

However, we were not able to display VF page from aura component.  

APPROACH

So in order to solve the issue of displaying Vf page from aura component, we have  to Disable Clickjack protection whenever we are using IFrame

Why and When to use IFrame?

  • An IFrame can insert all sorts of media. It allows you to add documents, videos, and interactive media within a page. By doing this, you can display a secondary webpage on your main page. It also allows you to include a piece of content from other sources. It can integrate the content anywhere within your page, without having to include them in your web layout’s structure. 

  • Developers mainly use the IFrame tag to embed(place content) HTML document within the current one, it lets you add an independent HTML document with its browsing context. It is useful for pulling content from other domains, it safely allows the advantage of being able to visually show data from other domains without letting them stomp all over your page with unlimited access. 

EXAMPLE CODE:

Redirect.vfp:

<apex:page showHeader="false" sidebar="false" controller="RedirectExample">
<apex:form >
<apex:pageblock >
<apex:commandlink action="{!redirect}" target="_blank">

<apex:commandButton value="Open in New Tab" />
</apex:commandLink>
</apex:pageblock>
</apex:form>
</apex:page>

RedirectExample.apxc:

public class RedirectExample {
public RedirectExample(){

}
public pageReference redirect() {
PageReference pageRef = new PageReference('http://www.google.com');
pageRef.setRedirect(true);
return pageRef;
}
}

vfpinsidelightning.cmp:

<aura:component implements="forceCommunity:availableForAllPageTypes,force:appHostable,flexipage:availableForAllPageTypes,flexipage:availableForRecordHome,force:hasRecordId,force:lightningQuickAction" >
    <iframe src="Enter your namespace here.com/apex/Redirect?core.apexpages.request.devconsole=1"/>
</aura:component>


Create quick action as shown below:


Now add this newly created quick action on your objects page layout

In 'Mobile & Lightning Action' section drag your quick action from the options provided and add it below 'Salesforce Mobile and Lightning Experience Action' .


In order to display vf page in the aura component using iframe, we have to follow the steps as mentioned below:
    
  • Go to Setup.
  • Write Session settings in quick find  search box .
  • Select Session Settings.
  • Uncheck ”Enable clickjack protection for customer Visualforce pages with headers disabled” under Clickjack Protection section.


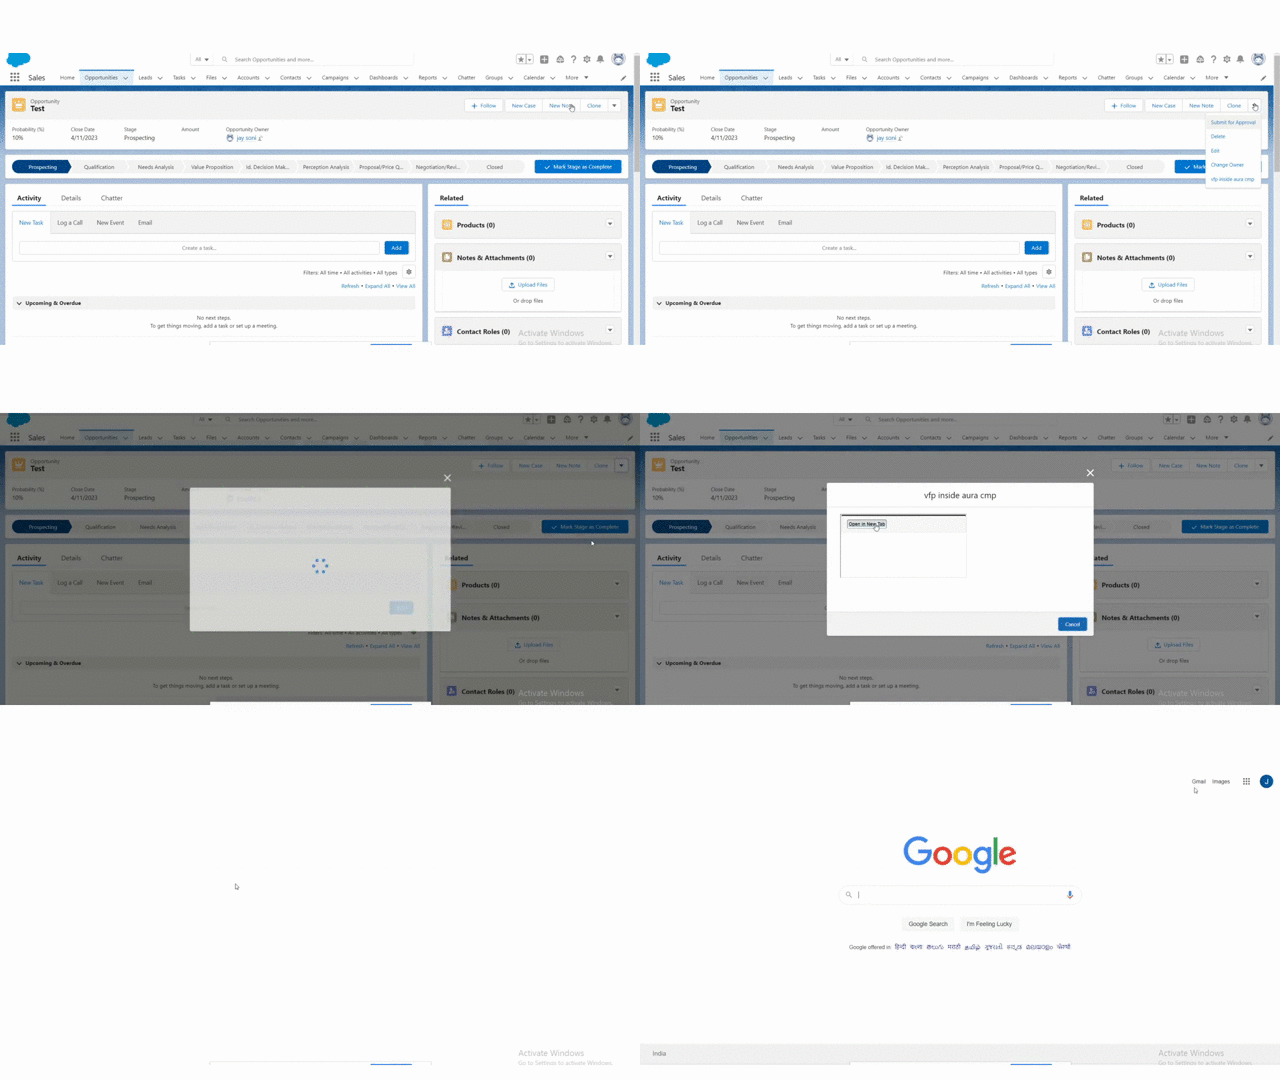
OUTPUT:


CONCLUSION

By following above-mentioned steps and given approach, We were able to display vf page in aura component by disabling Clickjack Protection via quick action using an IFrame.


If you have any questions you can reach out our Salesforce Consulting team here.

Thursday, 7 January 2021

Auto-update case owner of multiple records from list view in Service Console Application

Requirement:

Recently working with Service Console Application, came across a requirement where we need to auto update the Case Owner 
to current logged in user for all the selected case records from the list view. Along with that, we also need to implement it in a such way, so on auto assigning of the records, selected records should be opened in new tabs in a Service Console Application.

Challenge:

Using OOTB features of Salesforce, we can manually update the case owner of only one record at a time. However, in our case, we need to update multiple records with auto assigning of case owner with current logged in user.

Solution:

To achieve this,
  • We need to create a Custom List Button with a content source as a Visualforce page and added it to the Search Layout.
  • Basically, this visualforce page calls an action method from the APEX class and retrieves all the selected records and update case owner of each record based on the current logged in user.
  • We also need to implement JavaScript using Console API to open each updated record in new tab in Service Console Application.
  • The console API versions 42.0 and above of the Salesforce Console Integration Toolkit are supported in the Lightning Console JavaScript API.

ChangeCaseOwnerController Apex Class:

public class ChangeCaseOwnerController { 
    
    ApexPages.StandardSetController setCon; 
    public List<case> listofcases {get; set;} 
    public List<case> returnlist {get; set;} 
    public Map<string,string> returnMap {get; set;} 
   
    public ChangeCaseOwnerController(ApexPages.StandardSetController controller) { 
        setCon = controller; 
        listofcases = (List<case>)controller.getSelected(); //will fetch the selected records from record list
    }

    // method will update the owner of records assigned in listofcases 
    public PageReference changeOwner(){ 
        PageReference pref;
        list<case> caselist = new list<case>();       
 
        for(case c : listofcases){
            c.ownerId = UserInfo.getUserId();
            caselist.add(c);
        } 

        if(caselist.size() > 0){
            try { 
                    update caselist;            
                    returnMap = new Map<string,string>(); 
                    returnlist = [select id,CaseNumber from Case where id IN : lstcase ];  
                    for(Case casechild:  returnlist){ 
                         returnMap.put(casechild.id,casechild.CaseNumber); 
                     }
                  }  
           }
                 catch(DmlException e) { 
                      System.debug('The following Error exception has occurred: ' + e.getMessage());
          } 
       return null; 
    } 
} 

ChangeCaseOwner Visualforce Page:

<apex:page standardController="Case" recordSetVar="cases" extensions="ChangeCaseOwnerController" showHeader="false" action="{!changeOwner}"> 

    <!--include scripts from Salesforce Console Integration Toolkit: --> 
    <script src="../../soap/ajax/48.0/connection.js" type="text/javascript"></script>
    <script src="/support/console/48.0/integration.js" type="text/javascript"></script> 

    <script type="text/javascript">

    var mapofCases = '{!returnMap}'; // assign the map with Case Id and Case Number to variable
    mapofCases=  mapofCases.replace('{',''); 
    mapofCases= mapofCases.replace('}','');
    console.log(mapofCases); 
    var splitArray = mapofCases.split(","); 
 
    openTab(); //calling the function after getting separate case ids

    function openTab(){
        for (var i=0; i < splitArray.length; i++) {            
        openPrimaryTab(splitArray[i]); 
        }
    }

    function openPrimaryTab(arrayid) {
       var caseid=  arrayid.split("=")[0].trim(); 
       var casenumber=  arrayid.split("=")[1].trim();
       sforce.console.openPrimaryTab(undefined,'/'+caseid, true, casenumber);
    }
    </script>
</apex:page> 

Once APEX class and Visualforce page are created, we need to create a Custom List Button. To create a button, 
  • Go to Setup > Object Manager > Case > Buttons, Links, and Actions > New Button  
  • Set Name/Label Select List Button > Content Source Visualforce Page > Content Select Visualforce Page [ChangeCaseOwner]. 

Once all above steps are setup and configured properly, we can see the desired results as shown in below video.
 
Output:


If you have any questions you can reach out to our Salesforce Consulting team here.